Thursday, January 10, 2013

Dustpan Memo Center

(sneak peek of memo center)


You all know I’m a little different and get excited about the littlest things and of course the day I found this scratched up, missing-handled dustpan on my lunch hour was no exception.  You gotta love me!  Lol!  I like anything that’s green and metal, and well, scratched up and broken too!


Living in a world that's turned everything into plastic, how could I let this little icon of the past possibly end up in our local dump? No, no, no!  It was coming home with me!  I was sure I could find something to use as a handle and fix it up as good as new.

I believe my Grandma had one like this when I was a kid, only I think it was a copper color with a Dutch scene on it and it had a metal handle.  Yes, I found a picture of one!  Remember these?


By the way, this one’s for sale on Etsy if you’re looking for one. 
http://www.etsy.com/listing/40255516/vintage-metal-dustpan-folksy-motif

Well, I knew after bringing this little guy back to life I didn’t want it to ever have dirt swept into its face again, so I thought long and hard as to what I could do with it. 

At this stage of a project I like to ask friends and relatives for ideas and I got some great suggestions that included using it to hang and grow herbs (good idea and may be what I do with the next dustpan that crosses my path!).  Sometimes I just need to let a project sit for awhile and study it, and sometimes it’s a very long sit.  Believe me, I have several projects right now begging for my attention as I pass by.  Each time I walk past and look at them, my creative juices start circulating and then one day, BINGO – just the right idea comes to me! 

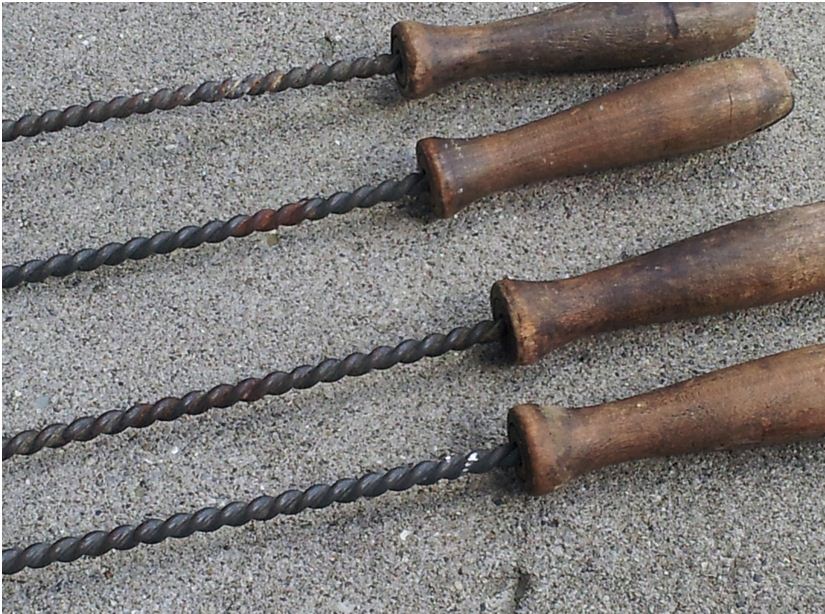
One chilly fall morning at a church tent sale I came across some antique wiener roasting sticks.  They were unique and interesting with the wire twisting all the way to the prongs.  One of them had a shaft that was slightly bent so I decided to use this one to cut and use as the handle to fix the dustpan.  It was just the size I needed!  Okay, the dustpan has been cleaned and shined and has a handle – now what should I do with it?  Hmm, back to the “studying” stage.

Not too long after the church tent sale I was browsing through an estate sale and came across an antique whisk broom in perfect condition.  It had beautifully aged a deep brown color and as soon as I saw it I knew it was the “missing link” to my dustpan project!  It was so pretty I tied a bow around it and stuck it in the dustpan!  Now I was on a roll. . . I hung the dustpan with some strong magnets, and filled it with a couple of memo pads, a pen, and note clips! 

Voila!  

All of a sudden it became a media center – 
who would have thought?!


Sometimes projects turn out better if you just let them evolve over time. 


It's easy to follow my blog - you can "Like" my Facebook page or enter your email address in the "follow via email" section of the blog.  

If you liked this story, you might also like  The Little Blue Box and American Flag Project.

Thanks for stopping by. I enjoyed your company!

My gate is always open, Jeri


Pin It!

Wednesday, January 2, 2013

DECEMBER PRIZE DRAWING WINNER!

AND. . . THE WINNER OF THE DECEMBER Picket Patch Reclaimed Treasures DRAWING IS - - - - - DEB FRAIM!!
 
Congratulations, Deb! I'll be mailing a pink (girly) Craftsman tool tote to you!
Thanks to all of you for your support in getting my Facebook page and Blog off to a good start!
I look forward to completing lots of projects and sharing my adventures with you in 2013!
 

Get alerts for new blog posts, items for sale, and prize drawings by signing up
to receive blog post notifications via email
(see sign up box in right-hand column of blog page)
or "LIKE" my Facebook page

WISHING YOU THE BEST IN 2013!

My gate is always open,  Jeri


Pin It!

Monday, December 31, 2012

HO HO Hold On!

What a transformation!

With a complete makeover in Santa’s workshop,

this little sled is as cute as can be and sure

to live a jolly life for many years to come!


Remember the days when it was fun to go outside and play in the snow until your cheeks and toes went numb?  Those were the days!  Was there anything better than growing up near a good sledding hill?  Whether it was on a toboggan, a sled with skis, saucer, or a big piece of cardboard, the anticipation would mount while you waited your turn to ride the hill. No matter if you made it all the way to the bottom or crashed and tumbled part way down, the ride was exhilarating!

photo copyright of Charles Schulz


On one of my recent adventures, I was rooting around in a dusty old garage and there, leaning up against a wall was this dry, frail-looking, little sled.  I loved it!  It instantly took my memory for a long ride back to the sledding fun we had had as kids.  


 When I rescued this little guy it was rough, dried out, and its red, faded paint looked so sad.   So off to Santa’s workshop it went.  Off came the rotting nylon rope.  Then this little orphan got a good cleaning and sanding with fine-grade sandpaper.  Ahh, that’s better!

Next a repair was made where screws that were too big had split the wood.  DIY Tip: It’s always best to first drill a hole that is slightly smaller in diameter than the screw you will be using.  This will prevent the wood from splitting when you insert the screw.  After I removed the screws, I glued and clamped the area and let it dry overnight before drilling holes and re-inserting screws.


A coat of pretty, red paint brought the handrails to life again!  I was very careful not to get paint on the wood that was to be stained.
Now for my favorite part of this project. . .the stain.  Not that I love to stain, but the dry wood literally soaked up the dark walnut stain and the transformation was instantaneous!  Look at the beautiful wood grain.  I was thrilled with the result!  


Just a little bit of brown glaze over the red paint and a light sanding on the edges gave it a nice vintage look.


And at last, the finishing touch. . .a new jute rope. 

This little guy was a Reclaimed Treasure indeed!


The little sled is now awaiting adoption into a new family who will love it as much as I have.   Wouldn’t it look great next to a fireplace, on a front porch, or used as a prop to sit the little ones on it for holiday pictures?

Here's a link to the Craigslist ad


Do you have a favorite winter-time memory?  I'd love to hear about it!

My gate is always open,  Jeri 


Pin It!

Monday, December 3, 2012

The Little Blue Box - Quick & Easy

I love the distressed look!

This was my first “reclaimed” project.  I found this kind of beat up, dirty, little wooden box 8"x5"x12" and immediately got a visual picture in my mind of it being used as a cute container to store or display things.  

A good power washing left it nice and clean and I decided to leave the nails sticking out of the top to give it some character.

DIY tip:  If you're going to power wash anything wooden, be sure to let it dry a couple of days before sanding, paintng, or staining.


Next I gave it a coat of a pretty, turquoise blue paint and let it dry for 24 hours.  Latex paint actually dries quicker than this but I like to make sure it’s  really dry before glazing.

To achieve the aged look, I dipped a clean, cotton cloth into my can of Olympic Burned Raisin color glaze and working in small sections, used long, wiping strokes to apply a thin coat of glaze. I immediately wiped off just the excess glaze with a clean, damp cloth.  Take off as much as you want to achieve the look you like.  I let the glaze color pool a bit more in the corner sections, on the edges, and around the nail heads to give it a more aged look.
Oh, and be sure to wear rubber gloves for this step :)

After the glaze dried for 24 hours I used a fine grade sand paper to sand the areas I wanted to look distressed.  Not too much, just until the wood showed through.

Hmm, I liked the box but was thinking
 it needed a little PIZZAZZ!  
Luckily, I found a medium sized glass door knob
in my stash and chose a big, shiny 
silver bolt to secure it.  

Wow! This was exactly what it needed!


Pin It!

Wednesday, November 28, 2012

American Flag Project


We Love America


Available as a Special Order item  Rustic Metal American Flag
When I came across some pieces of galvanized ribbed roofing this summer, my intention was to use the metal for birdhouse roofs, which I may at a later date, but before the birdhouse project ever flew (I know, bad pun) I saw some pictures of rustic American flags, and thought, I can do that. 

 The timing was just right too, as the birthdays of my two sons were fast approaching.  It’s sometimes hard to figure out what boys would like as birthday presents but I thought sure a flag to hang in their garage or workshop would be just the right gift. I like to give handmade gifts if I can, so I got busy and started creating.


Pin It!

It's a Wonderful Day!


Hooray!  The blog is up and running and I’m excited to finally be able to share my love of the hunt for just the right pieces of furniture and junkie things to restore or repurpose.   I invite you to come through my picket fence gate and down the path to my workshop to watch as these discarded, broken, and unwanted items are transformed into fun, functional, one-of-a-kind treasures. 

All of the items I feature in my blog posts are for sale, as well as other items, so be sure to view my BUY tab to see current items for sale and the link to Craigslist  that gives a complete description.
  The list will continually change so check back often.  You can be notified of new blog posts by entering your email address in the Receive Posts via Email box in the right-hand column of this page.

My Etsy.com store is coming soon and if I get enough projects completed this winter my plan is to also sell my treasures at the Ellenberger Park Farmer’s Market on the second Sunday of each month May through October 2013.  Guess I’d better get busy!

I need your help to clean out my shed to make room for more, but enter the shed at your own risk!  Lol!  See 
“The Stockpile” page for items waiting for me to give them some TLC.  (Pictures are not pretty but once restored these pieces will look fantastic!) Contact me to reserve the item that would look great in your home and choose a color and I’ll custom paint it for you!

I’d love it if you would share my blog with your families and friends and follow me on Pinterest and Facebook, too.  I welcome your comments and ideas, and hopefully I'll inspire you to try a DIY project of your own!  

It's been a great learning experience to set up a blog, edit pictures, and create blog posts and I look forward to re-connecting with old friends and making many new ones along the way.


My gate is always open,  Jeri


Pin It!